

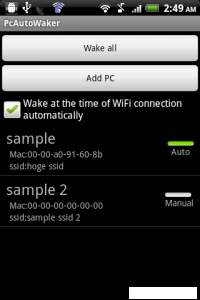
Configuring Auto Waker App:
download here: Auto Waker App
Once you have downloaded the Auto Waker App, you need to configure the app and the PC for proper functioning. The PC you need to wake up must be connected to a broadcasting WIFI router.
step 1:
First you need to give a name to your COMPUTER(PC) which you usually give while Installing Windows. This name is used to identify your PC on the App. You can enter this name in the App. The name you enter need not be the same as that of your computer’s network name.
step 2:
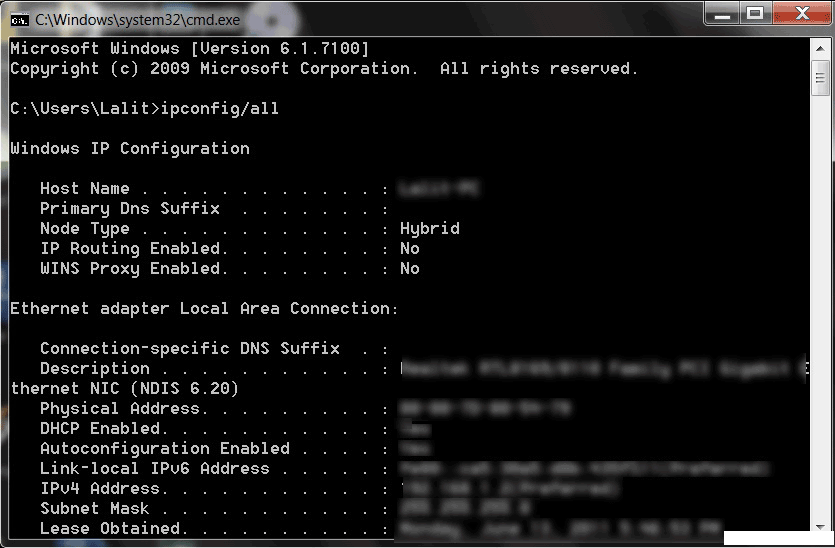
Next step is the MAC address of the target computer. You can found this address on the command (cmd)window of your computer.
Go to Start->Run and type cmd . This opens your command line interface. Type ipconfig/all and hit Enter.
You can find the label Physical Address under the Connection-specific DNS Suffix. The MAC address appears to the right of the label Physical Address and it is a string of six two-digit numbers of the format ##-##-##-##-##-##. Enter this Address in the App.
step 3:
Finally you need to enter the SSID of the wireless network your computer is connected to.After you have entered all the three credentials, you are done with it and you can place your computer in Sleep or Hibernate mode and wake it up using the Wake All button on the PC Auto Waker App. Still if it doesn’t work ,you need to read further below:(optional)
Configuring Your PC
If your Computer does not wake up, it’s because it is not set up to receive the Wake-On-LAN packet from the App. To set it up properly you need to restart your computer and view the BIOS Screen by entering the correct key which is shown at the start up. It varies for different operating systems. After you enter the BIOS Screen, you need to look for Wake-On-LAN option and enable it. It might also be “Power ON by External Modem” as BIOS screen varies with different computers.After you have enabled it, you need to configure your Windows too. To do this change the settings of the Local Area Connection in your computer. In Windows, go to control Panel->Network and Internet Connections. Right click on the Local Area Connection and choose Properties. After this click on Configure as shown in the image below.

After clicking on Configure, you would find the Power Management Tab. The three checkboxes visible must be checked if they aren’t already

If You Like This Post Share it using Below Buttons
And
If Have Any Problem in this Post?
Please Comment Below….
And
If Have Any Problem in this Post?
Please Comment Below….
0 comments:
Post a Comment
Here Comment is Do-Follow So Comment And Improve Your BackLink.